

Aşağıdaki bilgiler https://www.brianchristner.io/how-to-resize-ubuntu-root-partition/ sayfasından alınmıştır. Test edilip çalıştığı görülmüştür.
So a quick recap for those that don’t remember. We have to expand components of the filesystem in the following order. Physical Volume -> Volume Group -> Logical Volume -> Filesystem
In my scenario I increased the size of my Virtual Machine disk in VMware from 18GB to 28 GB.
- Step 1 Before we get started run pvdisplay in order to see the current state of the physical volume
root@Docker01:~# pvdisplay
--- Physical volume ---
  PV Name               /dev/sda1
  VG Name               ubuvg
  PV Size               16.00 GiB / not usable 2.00 MiB
  Allocatable           yes
  PE Size               4.00 MiB
  Total PE              4095
  Free PE               678
  Allocated PE          3417
  PV UUID               HiNAY2-sfqz-7fwT-tLvy-XKfT-3QR6-BXash5
- Step 2 Manipulate the disk partition table with fdisk
root@Docker01:~# fdisk /dev/sdb
n   (create new partition, select start and end cylinders, all free space is selected by default)
Partition type:
   p   primary (1 primary, 0 extended, 3 free)
   e   extended
Select (default p):
Using default response p
Partition number (1-4, default 2):
Using default value 2
First sector (33552384-33554431, default 33552384):
Using default value 33552384
Last sector, +sectors or +size{K,M,G} (33552384-33554431, default 33554431):
Using default value 33554431
w  (save partition table and exit)
Accept the default values that are provide that the “n” option returns.
- Step 3 Reboot your Ubuntu machine in order for Ubuntu to recognize the change.
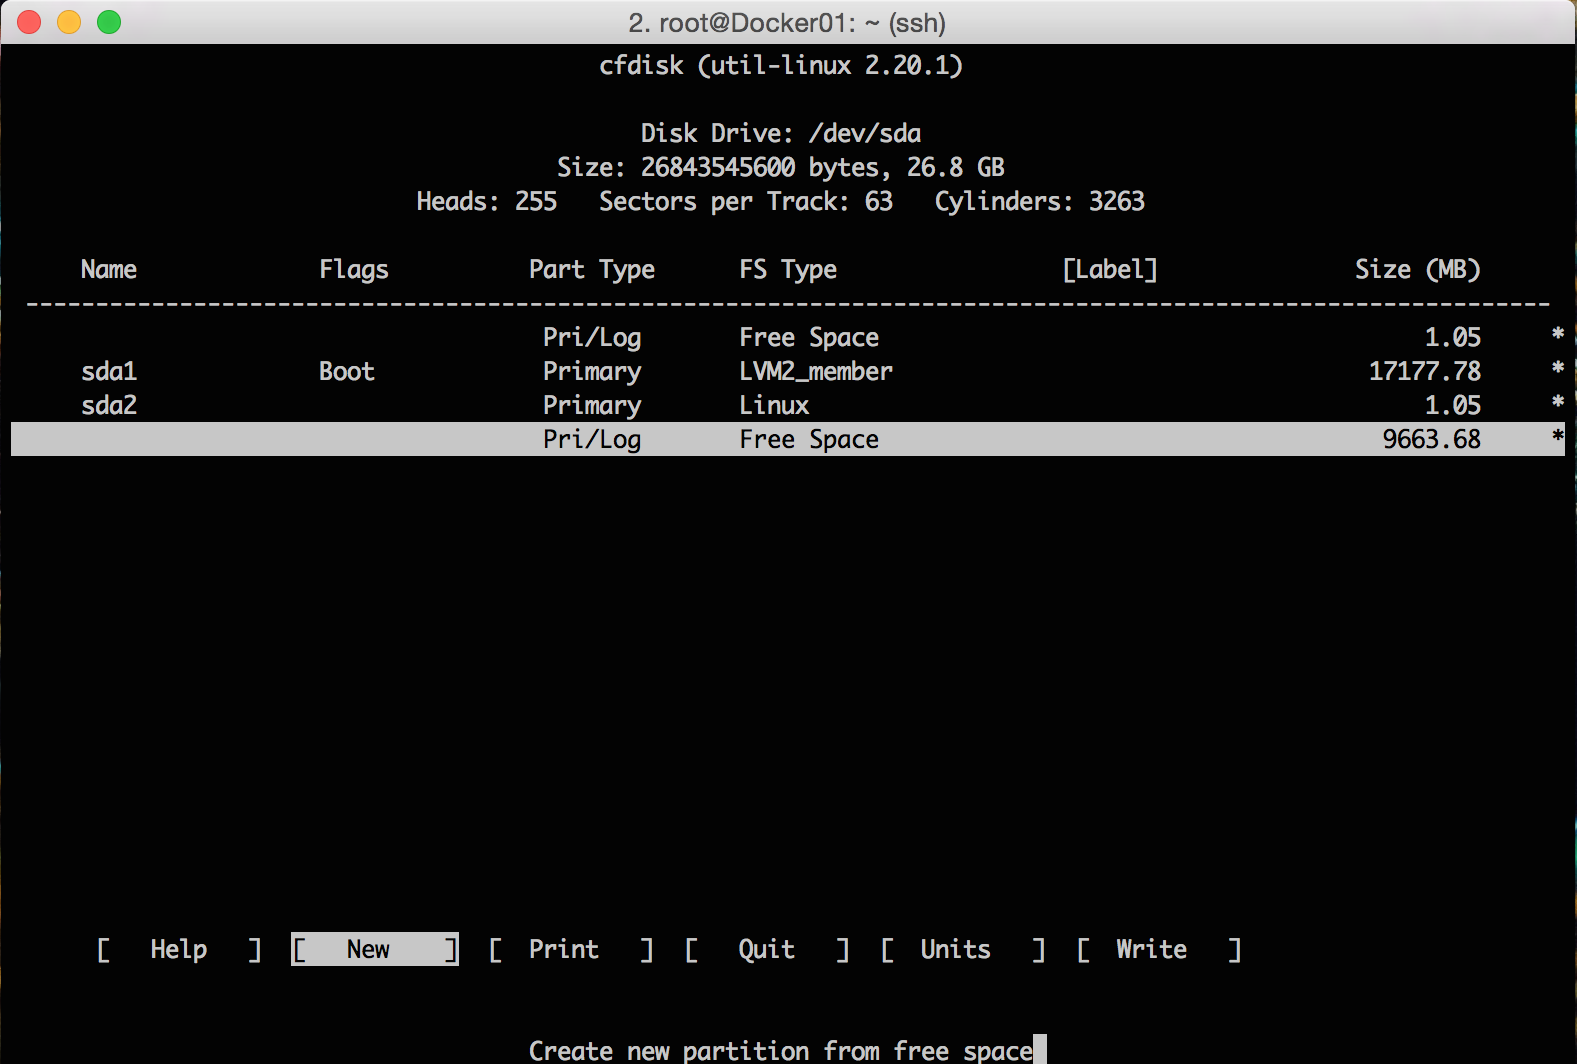
root@Docker01:~# reboot - Step 4 Update the partition table tool using cfdisk.
root@Docker01:~# cfdiskSelect [NEW] partition and [PRIMARY] for partition type. Select how big you want the partition and enter.
Once finished select [WRITE] to save your changes to your partition then [QUIT].
You’ve now created a new partition most likely /dev/sda1
- Step 5 Intialize the newly created partition with pvcreate
root@Docker01:~# pvcreate /dev/sda3
Physical volume "/dev/sda3" successfully created
- Step 6 Add the newly created partition to the root volume group. First rerun pvdisplay to show the new physical volume details. You should now see the new partition
  "/dev/sda3" is a new physical volume of "9.00 GiB"
  --- NEW Physical volume ---
  PV Name               /dev/sda3
  VG Name
  PV Size               9.00 GiB
  Allocatable           NO
  PE Size               0
  Total PE              0
  Free PE               0
  Allocated PE          0
  PV UUID               OEADew-tamR-EHil-FU4p-kIuW-F5rT-V0CTcY
Run the command vgs in order to get the name of your volume group
root@Docker01:~# vgs
  VG    #PV #LV #SN Attr   VSize  VFree
  ubuvg   1   5   0 wz--n- 16.00g 2.65g
Expand the volume group with vgextend then verify your volume group again once complete with vgs
root@Docker01:~# vgextend ubuvg /dev/sda3
  Volume group "ubuvg" successfully extended
root@Docker01:~# vgs
  VG    #PV #LV #SN Attr   VSize  VFree
  ubuvg   2   5   0 wz--n- 24.99g 11.64g
root@Docker01:~#
- Step 7 Next we need to extend the Logical Volume with lvextend
root@Docker01:~# df -k
Filesystem                 1K-blocks    Used Available Use% Mounted on
/dev/mapper/ubuvg-ubulv      8726456 7739868    520260  94% /

root@Docker01:~# lvextend -L +10G /dev/mapper/ubuvg-ubulv
  Extending logical volume ubulv to 18.58 GiB
  Logical volume ubulv successfully resized
- Step 8 Extend the Filesystem to fill the logical volume
root@Docker01:~# resize2fs /dev/mapper/ubuvg-ubulv
resize2fs 1.42.9 (4-Feb-2014)
Filesystem at /dev/mapper/ubuvg-ubulv is mounted on /; on-line resizing required
old_desc_blocks = 1, new_desc_blocks = 2
The filesystem on /dev/mapper/ubuvg-ubulv is now 4871168 blocks long.

root@Docker01:~# df -k
Filesystem                 1K-blocks    Used Available Use% Mounted on
/dev/mapper/ubuvg-ubulv     19048316 7744220  10420152  43% /
Leave a comment